
Pixel Art & Adobe Photoshop
Adobe Photoshop is the industry standard for (bitmap) image
manipulation.
Besides MS Paint, Microangelo, Pixen, Gimp and many other programs,
Adobe Photoshop can be used to create pixel art.
Adobe Photoshop offers many options you don't need for pixel art, and is
quite expensive.
MS Paint is my weapon of choice for creating pixel art, in combination
with Adobe Photoshop.
In particular, the layer options in Adobe Photoshop can be handy from
time to time, since MS Paint lacks this feature. Besides layers, Adobe
Photoshop offers all options you need, and more, to adjust bitmap
images, such as scanned sketches. Options like contrast enhancement,
dithering, scaling, color-correction, etc.
To limit the overall size of this tutorial, only a few options will be discussed in this chapter.
History
Back in 1987, Thomas Knoll began writing a program to simulate grayscale
images on the monochrome display of early home computers. Thomas and his
brother John continued writing image manipulation code, which resulted
in a program called 'Display'. 'Display' ultimately became 'Photoshop'.
Adobe purchased the license in 1988, and Photoshop 1.0 was released in
1990, exclusively for Macintosh.
RGB versus Indexed Color Palettes
Adobe Photoshop provides different image modes: RGB, CMYK, grayscale and indexed color.
Indexed colored images differ from images in other modes: an indexed
colored image uses a global palette or color table. Each individual pixel
in the image refers to a specific color within the color table. By
changing the pallete color, all the pixels that refer to the changed
pallete color change color.
If you don't use the indexed color mode but RGB (or any other mode),
each individual pixel contains information about its color, instead of
referring to a color table. To change an area with pixels with a
specific red color into an RGB image, you need to select all the red
pixels and give them a new color; there's no global palette used in this
type of image mode.
If you use a palette with limited colors and you choose to work in the RGB mode, you can guarantee that you use the same color red for every individual pixel: draw a palette in the image and use the color picker to choose the preffered color of your drawn palette.
The question as to whether you will use the indexed color mode or another mode, depends on the amount of colors available in your palette. Choose the indexed color mode if you use less than 256 colors, choose RGB or any other mode if you use a more than 256 colors.
Palette
I use the default sixteen color windows palette in MS Paint.
Once in a while, I take a look at the pixel art illustration in Adobe
Photoshop, with the right colors.
By the right colors, I mean the colors of the default or 'drububu'
palette that I use for my personal pixel art illustrations.
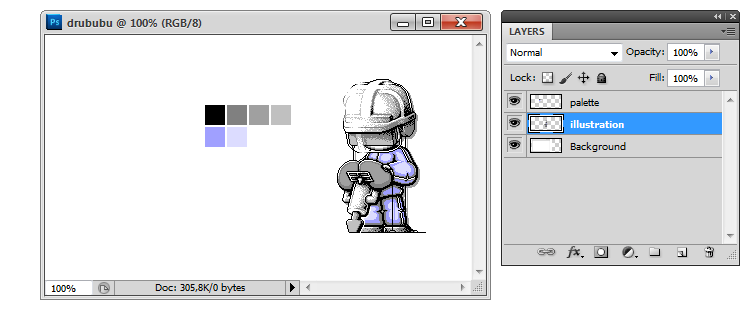
The image on the left is the illustration made in MS Paint. The colors don't match with the colors of the default 'drububu' palette. In Adobe Photoshop the standard window palette colors are replaced by the colors of the 'drububu' palette (see right image).
By using an indexed color BMP as the source, each pixel refers to
a specific color in the lookup or color table. To change the color
table, all you have to do is load a custom palette to adjust the colors.
The palette with the custom colors needs to be made once, and then it
can be used as many times you like.
The approach above only works if you use a limited palette for your
pixel art illustration.
If you use many colors, working solely in Adobe Photoshop may be a
better option.
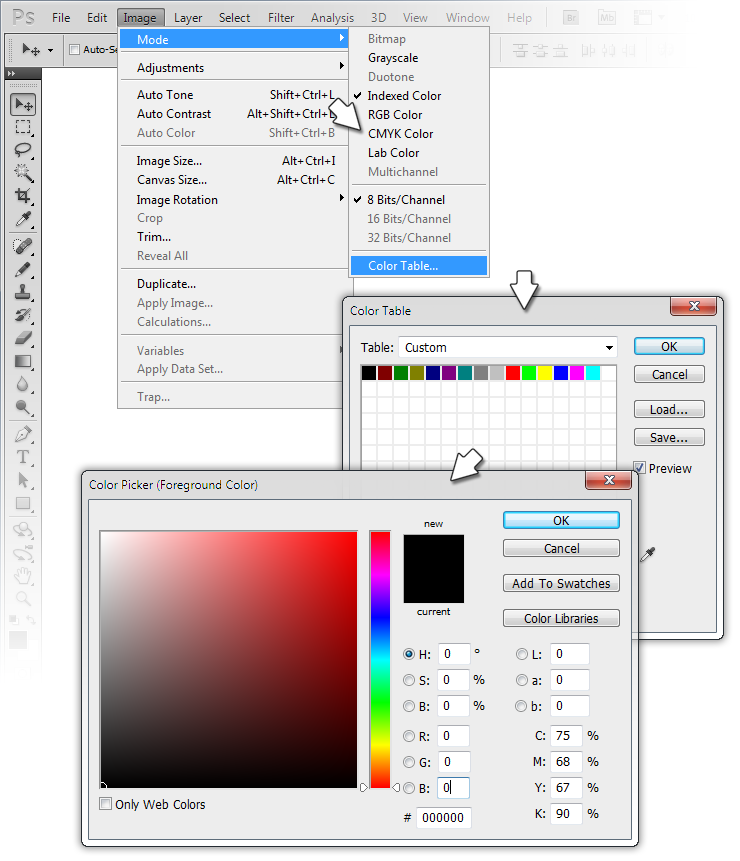
Adjusting the Color Table
In Adobe Photoshop, you can import a custom palette to overwrite the
color table of a color indexed image ('Image' > 'Mode' > 'Color Table').
Click on a color in the color table window to change the color. The
color window appears. Choose any color you like by moving the mouse
inside the colored area, or if you know the exact RGB or HEX color, type
the specific value(s) in the appropriate fields.
Repeat this process for each color in the color table you want to
change. Once finished, choose the 'Save' option in the color table
window.
The next time you want to change the color table of a color indexed
image with the same amount of colors, choose the 'Load' option and
select the palette you just saved.
Creating Pixel Art in Adobe Photoshop
Pixel art can be created solely in Adobe Photoshop.
Adobe Photoshop has some extra features which MS Paint lacks, such as
layers and 'sexiness'; it's cool to work with Adobe Photoshop... but
it's no guarantee your work will be good.
By drawing in different layers, artwork is separated from each other. If
you make mistakes, the content of a layer can be removed without
interfering with the artwork in the other layers.
Layers can also be made visible/invisible, which can be handy when
focusing on specific artwork in a specific layer.
In Adobe Photoshop, all kinds of features can be applied to layers, such
as masking, luminosity, saturation, and many, many more options.
To create an Adobe Photoshop file choose 'File' > 'New' or use the shortcut CTRL + N; the new window appears.
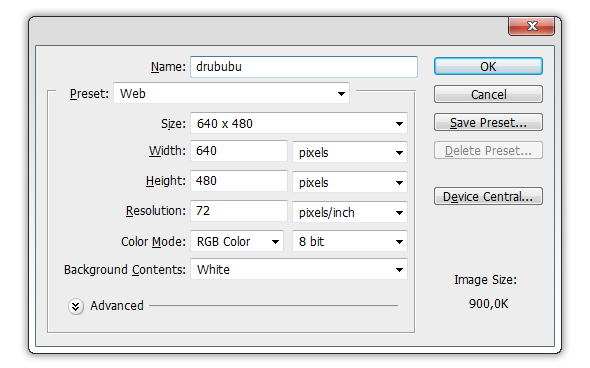
Fill in a name, or leave it as it is. The next thing you have to do is
to choose a size. The exact size is not important, but the type of unit
is: choose 'pixels'.
Be sure to use 72 pixels per inch and set the color mode to RGB. An 8-bit
color depth is sufficient.
Once you set your preferences, press 'OK'.
To be secure, directly save your newly create Adobe Photoshop file
before you start.
Save your work on regular intervals. Consider to save your work over
time as different files: drububu_00.psd, drububu_01.psd, drububu_02.psd,
and so forth. In case you make a mistake, or delete or merge layers
which you shouldn't, you can rely on a previous version, and by doing so
loose some time but not too much time.
Unlike MS Paint, Adobe Photoshop doesn't show a palette. You can choose
between two colors, a background color and a foreground color. To
adjust/change these colors, double click on one of them and choose any
color you like.
To prevent endless clicking, it's handy to create a palette with the
colors you need in a separate layer.
Draw some rectangles and fill them with the colors you need.
The Eyedropper tool - shortcut I - can be used to quickly select the
preferred color.
To switch back to the Pencil tool, use the shortcut B. To change the
foreground and background color, use X.
To zoom in and out, use the zoom tool; shortcut Z.
To zoom, you can also used the key combination CTRL + to zoom in, or
CTRL - to zoom out.

Once you are satisfied with the result, you can export your Adobe
Photoshop file as GIF or PNG.
Choose 'File' > 'Save for Web and Devices...', or 'ALT + SHIFT + CTRL +
S', and then choose the required file format and settings.
Scaling Pixel Art
More about scaling pixel art in Adobe Photoshop can be found in the ' 'Scaling Pixel Art' chapter.