
Pixel art & Microsoft Paint
The entire pixel art illustration is drawn in
Microsoft Paint, or just MS Paint.
MS Paint is definitely not the sexiest program there is, but it's my
weapon of choice for creating pixel art.
MS Paint comes standard with Windows and supports BMP, JPG, GIF, PNG, DIB, ICO, and TIFF. MS Paint does not support layers and animation, which probably accounts for the beautiful simplicity of the program.
MS Paint allows you to use two colors simultaneously, one color for the right mouse button, and one color for the left mouse button, so you can easily switch between colors without using the keyboard.
MS Paint is self-explanatory and easy to understand. This chapter explains the various options you will find in the program.
Tabs
At the top of the program you'll find menus with related options.
'Menu' (this tab doesn't seem to have a name),
Home, View and Text are described in the following text.

'Menu'
New

The 'New' option is used to create a new empty canvas. The canvas is the drawing area.
I you have already drawn something on the canvas, MS Paint will ask you to to save your work.
Use the shortcut CTRL + N for the same result.
Open

The 'Open' option allows you to open an existing project or load an image into MS Paint.
MS Paint supports a variety of file formats. You
can import images inthe file formats BMP,
DIB, JPG, GIF, TIFF, PNG
and ICO.
Use the shortcut CTRL + O for the same result.
Save

The 'Save' option is used to save your image.
Use the shortcut CTRL + S to for the same result.
Save as

The 'Save as' options is used to save your image.
Use the shortcut CTRL + S to for the same result.
The 'Save (as)' option is used to save your artwork.
You can choose between a number of file formats:
- Monochrome Bitmap (BMP, DIB)
- 16 Color Bitmap (BMP, DIB)
- 256 Color Bitmap (BMP, DIB)
- 24-bit Bitmap (BMP, DIB)
- JPEG (JPG, JPEG, JPE, JFIF)
- GIF (GIF)
- TIFF (TIF, TIFF)
- PNG (PNG)
Be careful not to save your artwork in JPG; your image is compressed,
which can be useful, but not preferrable for pixel art; your artwork
will lose quality.
Choose one of the other lossless file formats; the quality of your
artwork will not be affected negatively.
The 'Save as' option allows you to choose one of the following file formats:
PNG Picture
PNG is a good choice for pixel art; no loss of quality, commonly used on the Internet.
JPEG Picture
JPG compresses images, so the file size is reduced. The
problem with JPG compression is that isn't lossless; not ideal
for pixel art, more likely to be used for non-graphic imagery
like pictures.
Commonly used on the Internet.
BMP picture
BMP is a good choice for storing your artwork on your local computer.
BMP is not commonly used on the Internet.
GIF picture
GIF is a good choice for pixel art as long as your artwork doesn't have more than 256 colors; GIF doesn't support more colors.
Other Formats
Other Formats - prular - propose more than one option, but the only other file formats that MS Paint supports is TIFF.
The next options are a continuation of the menu options.

The 'Print' option allows you to print your artwork.
Use the shortcut CTRL + P to for the same result.
From Scanner or camera

The 'From Scanner or camera' option allows you to scan and import your artwork.
Use the shortcut ALT + F (menu) > m to for the same result.
Send in e-mail

The 'Send in e-mail' option is used to send your artwork by e-mail.
Use the shortcut ALT + F (menu) > d to for the same result.
Set Desktop

The 'Set Desktop' option allows you to set your artwork as a background image.
Use the shortcut ALT + F (menu) > b to for the same result.
Properties

The 'Properties' option is used to view a number of properties
concerning your current artwork or adjust the canvas size.
Use the shortcut ALT + F (menu) > e to for the same result.
About

The 'About' option allows you to view some information about the
version of MS Paint.
Use the shortcut ALT + F (menu) > t to for the same result.
Exit

The 'Exit' option is used to view some information about the version of MS Paint.
Use the shortcut ALT + F (menu) > x to for the same result.
Shortcuts
The most important shortcuts in MS Paint:
| Shortcut | Description |
|---|---|
| Ctrl + A | Select the entire image. |
| Ctrl + B | Put the selected text into bold. |
| Ctrl + C | Copy a selection to the Clipboard. |
| Ctrl + E | Open the Properties dialog box. |
| Ctrl + G | Show or hide gridlines. |
| Ctrl + I | Change the selected text to italics. |
| Ctrl + N | Create new canvas. |
| Ctrl + O | Open an existing image. |
| Ctrl + P | Print a picture. |
| Ctrl + Page Up | Zoom. |
| Ctrl + Page Down | Zoom out. |
| Ctrl + R | Show or hide the ruler. |
| Ctrl + S | Save the changes to an image. |
| Ctrl + U | Change the selected text to underlined. |
| Ctrl + W | Open dialog box Resize / Skew. |
| Ctrl + X | Cut a selection. |
| Ctrl + Y | Redo a change. |
| Ctrl + Z | Undo a change. |
| Ctrl + Minus (-) | Decrease the width of a brush, line or shape of a pixel. |
| Ctrl + Plus (+) | Increase the width of a brush, line or shape of a pixel. |
| Ctrl + V | Paste selection from clipboard. |
| Alt + F | Show menu. |
| Shift + F10 | Display the current menu. |
| Esc | Cancel a selection. |
| Delete | Delete selection. |
| F1 | Open Help (MS Paint). |
| F10 or Alt | Show or Hide menu buttons. |
| F11 | View a full screen image. |
| F12 | Save the image in a new file. |
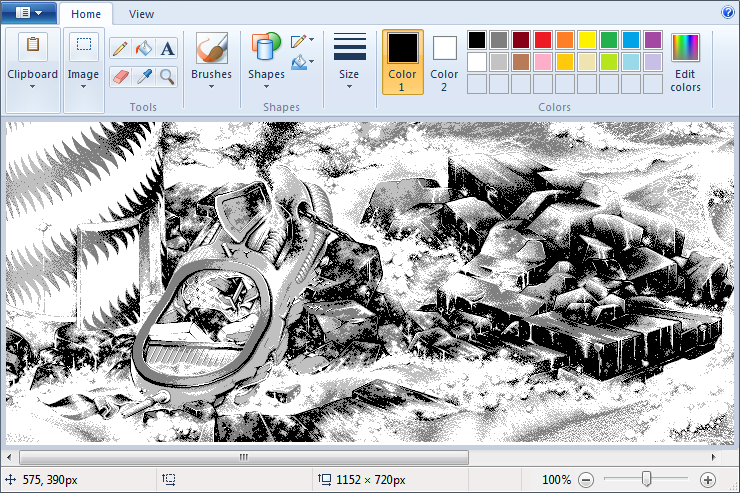
Home

This tab is used most often, and offers all kinds of options to create your artwork.
Each area of related options - Clipboard, Image,
Tools, Brushes, Shapes and
Size and Colors - is separated by a vertical line.
Depending on the width MS Paint occupies on your screen,
the areas are either fully displayed or shown with a small arrow at the
bottom.
Click on the arrow to see the full range of options for specific
tasks.
Clipboard

The Clipboard area offers options for copying and pasting selected
areas or external images to the canvas.
Most options can only be used once a selection has been made. If no
selection is made, these options are disabled.
Cut

The 'Cut' option allows you to copy the selection to the clipboard and the selection can be pasted back to the canvas using the 'Copy' option.
Copy

The 'Copy' option is used to copy the selection to the canvas.
The pasted selection is framed with a dotted line and can be positioned anywhere.
Paste

The 'Paste' option allows you to paste your selection into the
canvas in the top left corner of the canvas.
The pasted selection is framed with a dotted line and can be positioned
anywhere.
Paste from

The 'Paste from' option is used in the same way as the 'Paste'
option. It can be used to paste an external image into your artwork.
Use the shortcut ALT + F (menu) f for the same result.
Image

Select
The 'Select' option offers a number of useful features to select parts of your artwork on the canvas.
Rectangular selection

The 'Rectangular selection' option automatically generates a rectangular area between the mouse down position and the position achieved after dragging the mouse.
Free-form selection

The 'Free-form selection' option allows you to select a specific
irregular area on the canvas.
The selection type is either rectangular or free-form. The active
selection has a dark yellow background.
Select all

With the 'Select all' option you can select the canvas as a whole.
Use the shortcut CTRL + A for the same result.
Invert selection

With the 'Invert selection' option you can invert the current selection.
(The selection that is inverted is not displayed with a dotted line).
Delete

The 'Delete' option is used to remove the current selection. Depending on the fact whether the 'transparent selection' option is selected, the removed selection has no color - is transparent - or the background color (Color 2).
Transparent selection

The 'Transparent selection' option can be turned on or off. If turned off, the current selection is removed and replaced by the background color (Color 2) if you delete the selection.
Crop & resize
Crop

The 'Crop' option is used to crop the current selection; the area
outside the selection is removed.
Use the shortcut ALT + Z to undo any errors.
Resize

The 'Resize' option allows you to resize and/or skew your selection. The desired transformation can be set in the popup that appears.
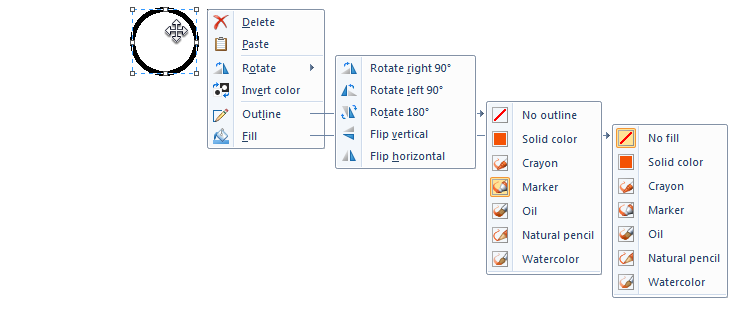
Rotate
Rotate right 90°

The 'Rotate right 90°' option is used to rotate your selection 90° clockwise.
Rotate left 90°

The 'Rotate left 90°' option is used to rotate your selection 90° counterclockwise.
Rotate 180°

The 'Rotate 180°' options is used to rotate your selection 180°.
Flip vertical

The 'Flip vertical' option is used to rotate or flip your selection in vertical direction.
Flip horizontal

The 'Flip horizontal' option is used to rotate or flip your selection in horizontal direction.
Tools

Pencil

The 'Pencil' option is the most important option if you want to make pixel art in MS Paint.
The 'Pencil' option is pretty straight forward. Color 1 in the color area corresponds with the left mouse button, color 2
- the background color - in the color area corresponds with the right mouse button.
Fill with color

The 'Fill with color' option allows you to fill an area on the canvas with the foreground color - color 1 - if you click the left mouse button. Click the right mouse button to fill an area on the canvas with the background color (color 2).
Text

The 'Text' option allows you to add text to your artwork.
Once the 'text' option is chosen, an extra tab 'text' in the top menu
will appear, with several options to manipulate the text. See
Text for more
information about these options.
Eraser

The 'Eraser' option is used to remove areas of your canvas.
Choose the background color (color 2) as the color that will appear while removing areas of your artwork.
Color picker

The 'Color picker' option allows you to pick a specific color in your artwork. Use the left mouse button to set the foreground color (color 1) and the right mouse button to set the background color (color 2).
Magnifier

The 'Magnifier' option allows you to zoom in and out.
Use the left mouse button to zoom in and the right mouse button to zoom out.
Use the shortcuts Ctrl + Page Up and Ctrl + Page Down for the same result.
Brushes

Brushes offer a variety of brush types; Brush, Caligraphy brush 1, Caligraphy brush 2, Airbrush, Oil brush, Crayon, Marker, Natural pencil and Watercolor brush.
Each brush type has it's own destinctive appearance.
Brush
'Brush' renders a brush with a solid fully opaque color.
Caligraphy brush 1
'Caligraphy brush 1' renders a brush that mimics the use of an caligraphy pen.
Caligraphy brush 2
'Caligraphy brush 2' renders a brush that mimics the use of an caligraphy pen.
Airbrush
'Airbrush' renders a brush that mimics the use of an airbrush.
Oil brush
'Oil brush' renders a brush that mimics the use of a oil painting.
Crayon
'Crayon' renders a brush which mimics the use of a crayon.
Marker
'Marker' renders a brush that mimics the use of a marker.
Natural pencil
'Natural pencil' renders a brush that mimics the use of a pencil.
Watercolor brush
'Watercolor brush' renders a brush that mimics the use of watercolor.
Shapes
The shapes tab offers a wide variety of predefined shapes and options for the outline and/or fills of these shapes.

The 'outline' and 'fill' options are used to create an outline or fill of a shape. The type of shape can be picked from the shape box.
Outline
You can choose between a number of types of outlines; No outline, Solid Color, Crayon, Marker, Oil, Natural pencil and Watercolor. Each outline type has it's own destinctive appearance.
No outline

'No outline' is pretty self-explaining; there's no outline.
Solid Color
'Solid Color' renders an outline in a solid color. The color is the currently active color (color 1).
Crayon
'Crayon' renders an outline that mimics the use of a crayon.
Marker
'Marker' renders an outline that mimics the use of a marker.
Oil
'Oil' renders an outline that mimics the use of a oil painting.
Natural pencil
'Natural pencil' renders an outline which mimics the use of a pencil.
Natural pencil has a slightly finer and lighter grain as the option Crayon.
Watercolor
'Watercolor' renders an outline which mimics the use of watercolor.
Fill
You can choose between a number of types of fills; No outline, Solid Color, Crayon, Marker, Oil, Natural pencil and Watercolor, the same types you can choose for the outline. Each fill type has it's own destinctive appearance.
No fill
'No outline' is pretty self-explaining; there's no fill.
Solid Color
'Solid Color' renders a fill in a solid color. The color is the currently active color (color 1).
Crayon
'Crayon' renders a fill that mimics the use of a crayon.
Marker
'Marker' renders a fill that mimics the use of a marker.
Oil
'Oil' renders a fill that mimics the use of a oil paint.
Natural pencil
'Natural pencil' renders a fill which that the use of a pencil.
Natural pencil has a slightly finer grain as the option Crayon.
Watercolor
'Watercolor' renders a fill which mimics the use of watercolor.
Once you've added your shape on the canvas, the shape displays a dotted outline and the mouse point changes into a four-sided arrow. You can right-click your mouse to adjust your shape (see image below).
Size

The size area is quite simple; you can choose between several thicknesses, to be more precise 1px, 2px, 3px and 4px. The abbreviation 'px' stands for pixels.
Use the shortcut Ctrl + Minus(-) to decrease the width of a brush, line or shape of a pixel or use the shortcut Ctrl + Plus(+) to increase the width of a brush, line or shape of a pixel.
Colors

Depending on which color is selected ('Color 1' or 'Color 2' has a yellow background) you can adjust the color by clicking the preferred color in the palette.
Edit colors
Click on the menu option 'Edit colors', to create or adjust colors.
If you click on 'Edit colors' a popup will appear.
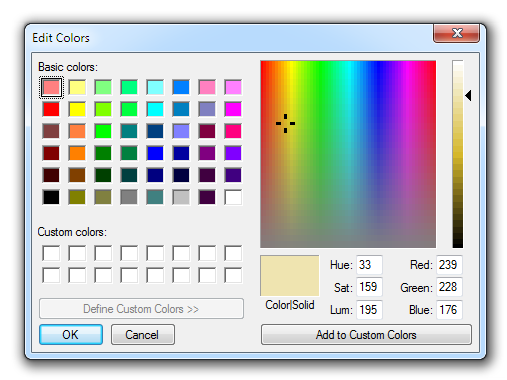
The popup menu does not work as you expect it to; you can't change the
color of a color in the 'Basic colors' area.
To create a custom color, use the color area on the right side of the
popup. Choose 'Add to Custom Colors' to add your custom color to 'Custom
colors'. Click 'OK'; the color will appear in the colors area of your
palette. Once added, you can't remove it. If you try to change your
custom color and press 'OK' a new custom color is added to your palette.
View

The view tab contains three areas for zooming in and out, additional features like rulers, gridlines and the status bar and an option to view your artwork fullscreen.
Zoom

The zoom area offers three basic options for zooming in, zooming out and viewing your artwork at 100%, which is the original size.
Zoom in

The 'Zoom in' option allows you to zoom in your artwork.
Use the shortcut CTRL + Page Up for the same result or use the slider on
the right bottom side in the status bar.
Zoom out

The 'Zoom out' option allows you to zoom out your artwork.
Use the shortcut CTRL + Page Down for the same result or use the slider on
the right bottom side in the status bar.
100%

The '100%' option is used to see your artwork at 100%, which is the original size of your artwork.
Show or hide

The show or hide area is simple and has just a three options; Rulers, Gridlines and Status bar.
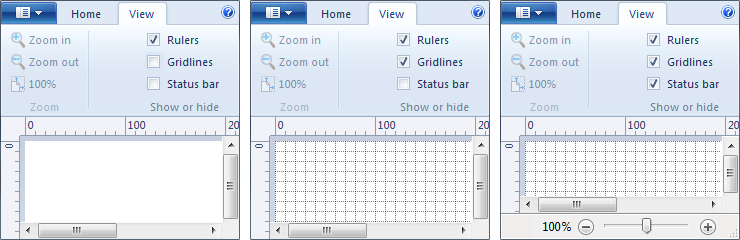
The rulers can be turned on and off by the shortcut CTRL + R.
The gridlines can be turned on and off by the shortcut CTRL + G.
The 'Status bar' option is very useful. When activated, a status bar will appear at the bottom of MS Paint. Some basic textual information is shown on the left side. On the right side you will find a slider that will allow you to zoom in and out of your artwork.
Zooming in and out is especially handy for very detailed artwork.
Display

The display area has only one selectable option, which is the 'Full-screen' option.
Full screen

The 'Full screen' option is used to see your artwork fullscreen. A border is shown if your artwork is smaller than your screen.
Thumbnail

The 'Thumbnail' option is not an option; you can't select it, since it's not visible if you have choosen the 'Full' option. Press a key or click with the mouse to leave the full-screen mode.
Text

The text tab will appear when if you add text to your artwork.
Four areas of related options are shown in the text menu; Clipboard, Font,
Background and Colors.
Font
Depending on the fonts available on your system, you may choose between
a wide variety of fonts. The size of the chosen font can be altered, as
can the appearance of the chosen font.
Most fonts - though not all - have different variants, such as bold
and/or italic. MS Paint offers options to underline and/or strike
through the font you have chosen to use.
Bold

The 'Bold' option allows you to make the text bold.
Italic

The 'Italic' option allows you to make the text italic.
Underline

The 'Underline' option allows you to underline the text.
Strikethrough

The 'Strikethrough' option allows you to strikethrough text.
The options 'Bold', 'Italic', 'Underline' and 'Strikethrough' can be combined.
Background

Opaque

The 'Opaque' option allows you to use a background color (color 2) that is displayed behind the text in the textfield.
Transparent

The 'Transparent' option is selected if you don't want a background color behind the text in the textfield.
Colors

The colors area is similar to the colors area in the home tab and works as described earlier.
Hint
If you want to make a big pixel art illustration in MS Paint - an
illustration that doesn't fit in the window - then consider dividing the
illustration into different smaller illustrations. Copy the part of the
illustration that you want to adjust, and make it a separate
illustration.
By working on smaller illustrations, you get rid of the need to adjust
the position of the area you work on within the window, if you zoom in
and out.
Once you are satisfied with the stand-alone illustration, paste it back
into the original illustration.
Once you have pasted back the illustration, some fine-tuning is needed
to blend the smaller illustration into the overall illustration.